A brief(ish) technical interlude, aka silly camera speak ahead
One thing that I love that I don’t to enough is long exposure light painting. The process, generally accomplished at night when it is possible to expose images for long periods of time, allows the building of light from both natural sources (enviromental) and from various devices like speedlights, flashlights, cell phones, etc.
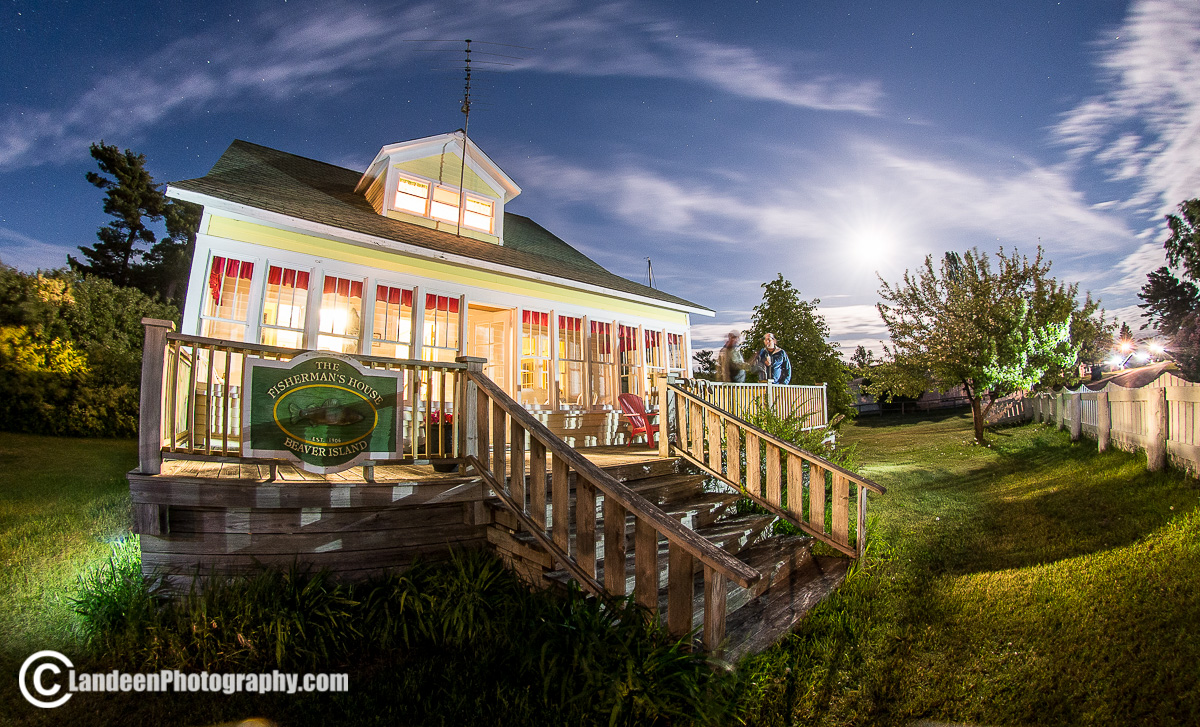
The image of The Fisherman’s House above is an example of what you can do with a little time, a tripod, a flashlight, and some patience. Once you get a little practice, how long it takes you to get the shot you want just depends on how much time you want to spend running around in the dark.
The above image was shot with a 10.5mm lens, in manual mode with a 15 second exposure (meaning that the shutter of the camera was open for 15 seconds), at f5.6 and an ISO of 280. Step one is setting up your tripod where you want, and getting your framing and focus. Sometimes this can be hard when it is really dark, so it always helps to have a good flashlight on hand to illuminate the subject and see exactly what you are pointing at. Once you have camera set and focused, it is generally best to switch the camera focus to manual so it stays where you set it, ensuring that your subject will stay sharp. In this case I think I just let the camera focus on the light from the windows, which was a pretty good point.
Once that is all set, then you need to set the f-stop, ISO, and shutter speed to achieve a good balance of natural light exposure. In this case, the sky is what I was looking at. I wanted a nice bright sky, and I set the ISO low, which reduces the amount of visible noise the sensor will create, keeping the image smooth and clean looking. Next I determined how long I thought it would take me to run from the left side of the house with the flashlight, around the front and to the other side, over by the tree. I figured that 15 seconds would do it, so last I set the f-stop (aperture) where it would give me the exposure that I was looking for in the sky and in the ambient lights around the house. Getting that exposure right just takes practice, as sometimes I have found in the dark the image on the LED screen can be deceptively brighter than what you will see on your computer screen. Getting in the habit of looking at your histogram on the camera helps also, if you have that feature.
Once that was set, I used a remote (you can use the timer on the camera also) to fire the camera while I was running around lighting the house. Each time I would walk back and look at the preview on the back of the camera to see if I was giving the different parts of the house enough light with the flashlight.
The set of motions that I went through for the final image was to stand on the left side of the house, click the shutter then “paint” with the flashlight the grass near the porch. Then I ran around behind the camera and started waving the light over the front of the house in a up-and-down motion, like spray painting, until I thought the porch and wall was properly lit. I ended the movement over by the tree on the far right, where you can see the branches are bright, pointing directly at the guys on the porch to give them some extra light.
The whole operation from getting the camera out took probably 15 minutes. You can imagine if one were to spend a good amount of time on a particular subject, with different lights, colored gels, strobes (for stopping motion and getting sharp subjects), etc, what you could accomplish. The possibilities are limitless.
One more example:
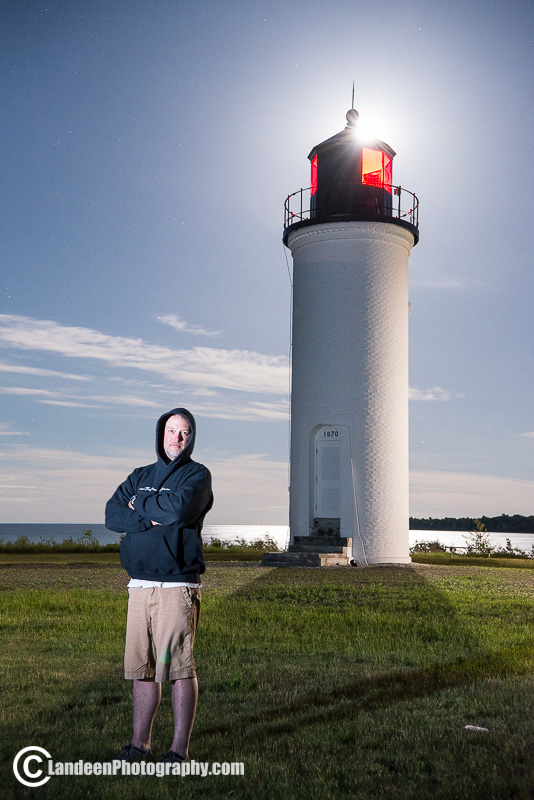
 This photo of Kevin hanging out by the lighthouse (as well as the opener of Dan from the last post) was set up the same way: get camera, ambient exposure, and focus (on Kevin) set, then open the shutter and add your light.
In this case, the light was a speedlight. (strobe) This emits a quick, bright light that is good at capturing detail on things that may move around during the exposure. (People, trees, etc) I sat behind the camera and had my assistant (I think it was John- I may have had a few beers before this night photo-outing) pop the flash on my command from over off camera left. If you look at the shadow from Kevin you can get an idea where the light was.
We had to do it a few times to get it right, and I had to keep moving the tripod to keep the moon right there poking out from behind the top of the lighthouse.
I am just disappointed that Kevin is not in the habit of wearing tuxedos around for fun on the island, because a bond-ish look with a martini glass would have made this pretty epic. Or a banana suit. That would have been pretty epic, too. (Kevin, get on that.)
Obviously there is a lot to this type of photography, and I am just skimming the surface when it comes to the finer settings and techniques. If you have interest, I have been told that this book is a good resource, one of these days I probably should buy it and check it out.
For today’s island tip
To stay in the vein of taking photos at night, I would advise to take a bag or backpack and keep track of your crap in the dark when out playing. Leaving lenses, remotes (did that on the above photo) and other stuff out in the grass is a great way to lose things you probably need. An off camera speedlight (or 3) is helpful, as we as a good, bright, multi-lumen output LED flashlight for painting light and looking for lost things in the dark. (Also, a flashlight with a clip or lanyard will help you not lose the thing you need to find other things.)
Also, if you think you are going to be in the habit of slinging around expensive gear in the dark while partaking in the consumption of alcohol, be sure you have an insurance policy on your stuff. Peace of mind, and all.
-Alex who promises that tomorrows post will contain photos of fishes. Also, I had to bang post one out eleventh-hour, so please excuse any grammatical nonsense or other textual errors.
On this day we thank:
Smith Optics
&
Patagonia
&
Howler Bros.

I always dig your light paintings, Alex. Thanks for the tutorial. I think I’ll go see if my Brownie can handle it.
Thanks, Mike! Don’t be too hard on that old girl…
Class dismissed.
Nice techniques. I have done some long exposures but never played with light like you did. Selecting ISO is not something I’ve done before since I learned photography in high school and college where you had that preselected in your camera, -old school and all. I finally saw some carp and a smallie from your trip but had to see that on the orvisnew.com newsletter. I see that you’re into quality and alcohol more than burning the midnight oil to make the media cycle. Good on ya!
Quality and Alcohol, maybe a new site tagline?
…fishy stuff tomorrow.
Thanks for sharing the techniques. Unlike a magic trick, now I have some idea how its done yet the photos are still awesome. Also, Bob Seger. Looking forward to Day Four!
I have always felt, unlike magic, that photos are more interesting when you start to be able to figure out how they were created. It gives you as the viewer a little way in, a little bit of the inspiration.
“Trying to lose the awkward teenage blues…”
Sweet summertime.
Hi Alex,
I love the light paintings and the stories! I think I will strive to be a photojournalist in my next life. I live in the house with the stone wall and little red gate, across the street from the Fisherman House. I’m coming to the Island tomorrow. Hope to meet you. Tell Billy and Tammy “Hello”.